Rebuilding a 79 300TD (123 chassis) Front Suspension
This is fairly complete but I have some other stuff to add at some point...
List of Sections from the 123 Chassis Manual
Basically almost all of the 33-nnn.pdf sections on the 123 Maintenance CD dealing with the front suspension. It's good to have these at the car to refer to procedures and torque specs for putting things back together. Print, punch, and put in an indexed 3-ring binder and you will be happy to get at each section easily whilst in the midst of the work.
You might also want to write down torque specs on all fasteners, just to save you time when you are putting things back together.
|
SECTION |
TITLE |
|
33-300 |
Adjustment of wheel bearing play |
|
33-310 |
Removal and installation of front wheel hub |
|
33-320 |
Disassembly, inspection, repair, and assembly of front wheel hub |
|
33-400 |
Removal and installation of steering knuckle |
|
33-410 |
Checking the steering knuckle |
|
33-420 |
Removal and installation of steering knuckle arm |
|
33-425 |
Checking supporting and guide joint of steering knuckle bearing |
|
33-430 |
Replacement of sleeves for supporting/ guide joint of steering knuckle bearings |
|
33-440 |
Replacement of supporting joint for steering knuckle bearing |
|
33-500 |
Removal and installation of upper control arm |
|
33-512 |
Removal, disassembly, assembly and installation of lower control arm |
|
33-515 |
Removal and installation of brake support |
|
33-520 |
Reconditioning bearing of lower control arm |
|
33-550 |
Checking and repairing bearing of upper control arm |
|
33-560 |
Checking upper control arm |
|
33-570 |
Checking lower control arm |
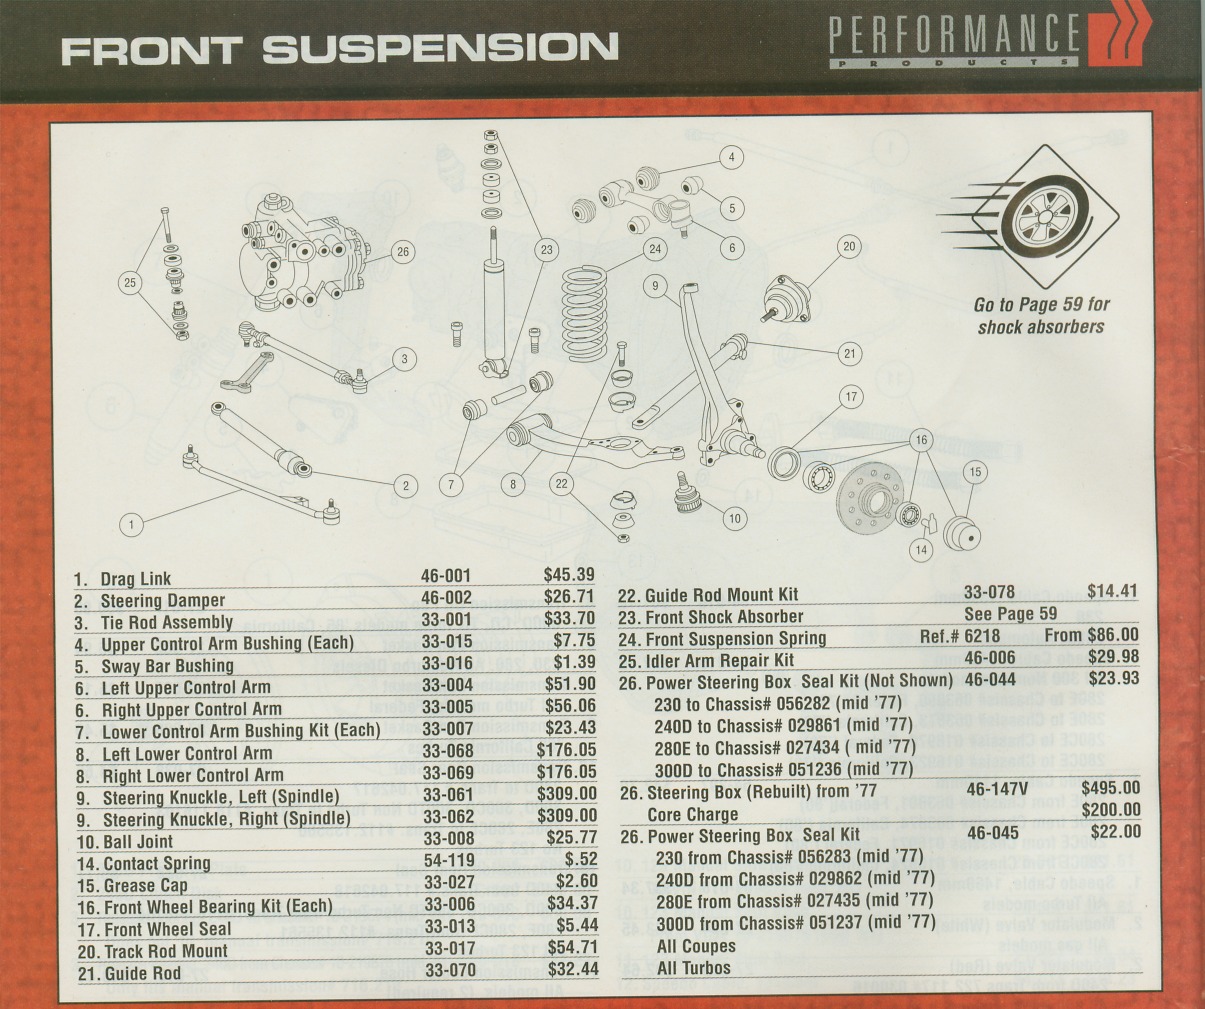
Here is an image of the drawing from the Performance Products catalog -- it shows the parts described here. There is a table below of the parts you need from here, though it does not show nuts and bolts. Click on the image to see a bigger better image you can zoom on.
My Writeup of the Project
Last week my son called me to say the front wheel had fallen off. Got it towed home and deposited in the driveway. Ordered parts, most of which arrived by Saturday (except for spring compressor which I hope gets here today). Respects to others who have done this and reported on it, and I hope I can add a bit of knowledge and a lot of encouragement to the lore.
Right front top ball joint tore out of the upper control arm ( I have pix to post when I finish it all -- very ugly). Ripped the aluminum ball joint socket right open. Lower bj popped out as well, leading to various damage on that side (broke the shock off too) as wheel/hub all was hanging by brake hose. Tow truck driver attached a hook to outer steering link and bent that so it will have to be replaced. With the ball joints popped out and lower CA dropped at lower end of travel the spring had about 1/2 inch of compression, so a bit of prying and it popped out (I had a rope tied around it but it didn't really have much energy left in it so just kinda plinked out). Got the bushings changed on right lower CA, new CA on top -- not difficult at all with spring out. Did the upper on left side, waiting for spring compressor to do left lower CA bushings and bj and put right side back together.
Went and rented the mcparts bj press, tried to remove the lower bj (what was left of it) using hot wrench and BFH but that did not work. Off to a shop to get them pressed once I get the spring compressor to get the left side off. I think this might be the best strategy as beating on things does not look to do them well.
I had ordered upper CA inner bushings as these were shot and front tires were "knock-kneed" -- I am wondering if the stress of this situation caused the bj to fail. Strong suggestion: If you notice wear on inner front tire edges, or squeaking from the suspension, change your CA bushings and bj's ASAP. Buy the upper CA assembly with bushings and bj installed and changing this item is maybe a one-hour job. Don't mess around with just the bushings as it will probably take longer to do the job and you still will have an old bj.
A few observations:
This is not a hard job except for bj R&R -- all the rest of it goes quite smoothly. I marvel at the ease of doing this and have yet again found appreciation for the Benz engineers for making a fairly complicated system easy to work on (maybe the mechanical engineers could swap places with the electrical and vacuum engineers...). I printed and studied all the sections of the manual and previous emails on this topic, but it all seems fairly intuitive once you stare at it a bit (and respect the spring aspect).
Prop the car up on jackstands or equivalent, high enough to make it easy to reach everything in the wheelwell without bending over too much (at least for us tall folk).
It would seem to me that one might want to do this to your car just as a matter of course if it has not been done yet -- parts are rather inexpensive. If you have the spring compressor and a way to do the bj replacement easily (a shop or proper tools of your own) you could easily do this on a Friday night/Saturday.
An impact wrench makes removal very easy on all nuts/bolts. It helps too if your car is a southern one with no rust in the system after living most of my life in the salt belt and having cars rust away I see another benefit to being in Houston and buying cars from the south). Retorque to specs in the manual using blue stuff on the bolts. A vise and dish soap does the pressing of inner rubber bits in the lower CA quite nicely.
The weird lower eccentric CA bolt is both elegant, and, well, a bit eccentric, for adjusting camber I guess. Front alignment will clearly have to be done after this job is complete.
I need to get a gauge to measure front wheel bearing play when that goes back together.
I will post pix of the damage as a warning to others not to let things go too far before restoring bits that should be done as a matter of course (I have learned!!!). I will also put together list of parts so you can send that along to Rusty. Some of the bits are reusable (bolts, washers but get new nuts with nylon locks) so you won't need to buy new ones unless old ones are rusted or otherwise damaged.
Thanks to all who have been there before -- your posts were inspirational and encouraging and informative. I was really apprehensive to do this, but having done most of it now, it is quite easy and simple for probably even novice mechanics with a couple of wrenches, sockets, and the spring compressor (when I get it -- rent from Rusty). Don't be intimidated!
--R
I just finished this job today (well, yesterday now) on my 79 300TD. It is not hard, and was actually kinda fun (because it really wasn't too hard). It took me a few days as I had to chase down parts I needed and had not ordered, and had to find someplace to press the ball joints, and had to wait for UPS to deliver the spring compressor, and other parts dribbled in. You could do it in a long day or over a weekend if you have everything in hand. Advice: order ALL the stuff now in one shot, do the job soon, and you will be very happy and maybe save some aggravation.
First, thanks and gratitude to others who posted instructions and pix on this, and pardon any repetition/plagiarism. You all encouraged me to do this, even though at the point I had to do it I had no choice, I felt better with a map...mucho gracias. And feel free to comment or criticize -- I have no pride of authorship and minimal ego invested.
I had ordered upper CA bushings to replace them, as the front tires were wearing on the inner edges, and were "knock-kneed." But before I could get to it an upper ball joint broke (actually, the ball tore and pulled out of the upper CA socket), which caused the wheel to fall off, and other stuff to break, and a tow home, and inopportune opportunity to do this job not at a time of my choosing. So, here is my story.
You need to do four things before you start deconstruction:
1. Get the spring compressor. I am sending Rusty's back to him so get in line. For $75 you can save a lot of time and fear.
2. Find a decent Benz shop that has the ball joint press and get them to do the lower ball joint beat out/press in (and use Lemforder bj's -- the other ones break going in, and can break the presses too if the bj breaks). "Nino" at the place I took it beat the old ones out with a ball peen hammer round end placed on the bj and another BFH to bang on the flat end of that. Inelegant but it worked. I think he had done it a time or two before. I suppose I could have done that but I didn't have the proper Benz press (it is angled properly to fit the steering knuckle and ball joint angle), and tried the basic McParts loaner press but it didn't really do the job for me though another lister has details of how he used it. NOTE: One of whatever ball joint types Rusty sent me broke while being pressed in, and it cost me $42 for them to go get a Lemforder. Get these to begin with. The ones I got had no name on them. I have one of those and a Lemforder now, and have some minor paranoia that the no-name thing is gonna break again... The owner of the shop (who turns out knew the PO of my car well -- he was an independent Benz mech himself -- so we reminisced a bit about that) said that happens a lot with other brands and they won't use them for that reason. He has also broken 2 expensive presses when bj's have broken, so he has paid the price bigtime for this lesson I share with you. Word up.
3. Make a list of ALL the parts (see below) and get them so you have them on hand. Parts is cheap money. Rusty will ship free and no sales tax, but I found stuff dribbled in from various places over a 3-4 day period, and a couple of things were not right for some reason, and I needed to get some more things once I tore into the job. I was lucky there was a parts supplier close by with decent prices for these odds and ends.
4. Print out the list of sections of the manual, organize them, and read through them. I presume you have the manual, if not get this and read all the parts of the section on front suspension.
And ask around for a good alignment shop that knows how to do old Benzes, and get that on your schedule. The shop that does the ball joints can probably give you a referral. I am lucky I live in a big city with what seems to be a significant congregation of independent Benz shops, parts places, and other knowledgeable specialty shops within 15 min or less of the house. For that I am thankful.
If your car is greasy or dirty go to the car wash and give it all a good spray. down under. It is so much easier and pleasant to work on a clean car that isn't all greasy and nasty.
Tools:
An impact wrench/sockets will make you very happy to quickly take things apart.
Also an air hammer with pickle forks to remove tie rod and ball joints from their arms/knuckles (NOTE: I bought a set of these pickle forks for air hammers and general beating at Sears a few years ago for maybe $20 and had them in the tool box, and this was the first time I have used them -- very cool tools. I see them at McParts now. The name starts with an "L" I think -- Lindy or Lisle or something and they make a bunch of interesting tools -- and they are in a bubble pack with red paper. Worth every penny.) Also have a vise and torque wrench.
Some metric hex (not 12 point) sockets and wrenches up to about 23-24mm (seems like you only use about 5 of these for most everything but I forget the particular sizes -- like 10, 15, 17, 19, 23mm I think).
You also need a floor jack to raise the car and lower control arm, and two or more jackstands to support the front end.
A big hammer and medium pry bar help to persuade things in and out easily when you need a tap or two.
Lay out all your parts for each side of the car, and have your tools laid out and organized, and you will be a lot happier. Most stuff you can reach without crawling under the car, so a milk crate makes a nice seat for the work. A bit of bench space around your vise is nice too. And a clean place and a roll of paper towels to clean and repack the bearings (a hint from someone else -- put them in a plastic zip bag with the proper amount of grease and work it into the bearings -- no greasy hands!!!).
Parts:
| Part Name (# needed) | Approx Cost Each (2003) |
| Upper Control Arm Bushing (x4) | $7.75 |
| Sway Bar Bushing (x4) | $1.50 |
| Upper Control Arm (L and R) (Upper Ball Joint is in there) | $54 |
| Lower Control Arm Bushing Kit (x2) | $23 |
| Lower Ball Joint (x2) -- get Lemforder | $30 |
| Contact Spring (fits in the hub/bearing) (x2) | $0.50 |
| Track Rod Mount (big ball joints on firewall) | $55 |
| Guide Rod Mount Kit (bushings etc.) | $14 |
| Shock Absorber (Bilstein) | $66 |
| Various Nuts and Bolts for the bushings, etc. if you need them |
I think that is it.
Summary of procedure if you are doing the whole deal (and you might as well while you are doing any of it as the marginal time and cost are minimal):
If you ponder the arrangements you will see that you can change the upper control arm without removing the spring, but to do the lower control arm bushings and ball joints you will need to remove the spring, so just remove the spring to begin with and you can get at other stuff much more easily. There is a trick or two I learned on this -- one is that the hole for the spring compressor at the top of the fender well is the exact same size as the spring compressor I used, so some grinding was necessary (on the hole, not the SC!) to get it in and out. No biggy but sorta annoying.
Drill with a round grinding bit reamed it in a few minutes. Also, fitting in the plates into (and out of) the spring coils took a little finessing and a bit of prying on the spring coils but I discovered after the fact that if you put the plate in a middle coil you can spin it to the top/bottom coil easily (the instructions say you need 9 coils but I could only get 7 or 8 which was OK). The spring is really the only moderately fiddly aspect -- the other parts come out/go in easily -- but is easy with the compressor. To do the right side spring you need to remove the air cleaner, and this is a good time to have at the intake manifold and valve cover with degreaser, a scrub brush, and a strong hose.
Jack up car and put on jackstands on either side of front, parking brake on and back wheels chocked.
Take off tires.
Take off brake calipers (two bolts in back -- turn the steering wheel either way makes these easy to get at) and hang caliper on sway bar with some bungees or wire
Pry off hub cap with a little screwdriver and a little tapping -- it fits tightly but slides off easily. Watch out for a little copper springy thingy in there. Use a hex key to loosen the bolt on the nut that holds the hub on the axle and back it off.
Pull hub assembly straight off and bearings should come with it. These will need to be cleaned and regreased. Check the grease seals on the back and replace if necessary. Mine and the grease looked pretty new so I did not replace them. This is probably a good time to check the condition of the brake rotor and replace if it is worn down a lot, and replace the brake pads/sensors too. You'll have new brakes out of this deal and it is easy to do at this point.
Time to work on spring -- put your floor jack under the lower control arm (use a piece of wood as a shim) and jack it up a bit, then do the spring removal per the instructions. You will need to remove the upper ball joint nut and separate the upper knuckle attachment to bj (pickle fork helps here) to lower the lower control arm and remove the spring. At this point you can remove the shock absorber too. I was apprehensive of this step but the spring compressor made it easy though you need to have lots of respect for the spring. Previous listers advocate a safety chain/strap -- use your own judgement and risk aversion index. I think with the proper spring compressor it is OK not to have that stuff in the way. YMMV.
Once the spring is off you can remove and replace all the other rubber bits very easily in an apparent process. Undo the bolt holding the upper control arm from the engine compartment and it slides in/out easily. The upper CA to sway bar bolt/bushings come off easily. The lower CA comes off when you undo the big eccentric bolt on the frame, and the inner bushings come out with a bit of hacking at the thin aluminum sleeve and some minimal force. Use a vise to press in each bushing in the lower CA, and then put in the new aluminum sleeve and flare the end over using a ball peen hammer round end, or something similar. Some dish soap was recommended for lubricant of the new bushings and that worked well until my wife came looking for it and the bottle was all greasy, alas.
You will then need to separate the steering knuckle/lower ball joint from the lower control arm -- pickle fork and hammer can make this happen, or use an air hammer/pickle fork for quick work of it. I like the noise the air hammer makes, and the impact wrench too. It sounds like.....real work!
Take the steering knuckle and ball joint to the shop to get it pressed out/in, or if you are masochistic have at it yourself. I think you will have to remove the steering arm from the knuckle to do this (I did that anyway).
You can do the steering links and boots independent of the stuff above, but is easier to get at these bits while doing the other stuff. In any case you will have to remove outer link ends from the steering knuckle, so removing the whole link is just another joint removal.
Assembly is reverse of above. Fiddling the spring, steering knuckle/upper ball joint, and shock absorber back in all at once takes a bit of of time but just be patient and it all goes in well. Using the floor jack on the lower CA helps to get it all put back together. Note that the spring end fits into a little pocket on the lower spring pad, so you might have to raise/lower it a time or three to get it in right. The shock you have to push mightily on as it does not want to compress easily, but you need to do that to get it to go in its upper hole after mounting it below to the lower CA. Three arms/hands would help at this stage. Also note that the manual I recall says the mounted shock absorber also serves to keep the spring from extending too far, so be aware of all this geometry when putting it all back together.
Clean/repack wheel bearings with appropriate grease. Someone suggested putting the grease and bearings in a plastic bag then working the grease in that way -- keeps hands and surroundings clean. Sounds like a good plan. CAUTION: clean them well so as not to mix greases as something dire might happen as they have different soaps in them. I am not sure what that means or what might happen, but heed the word.
Replacing the hubs and tightening the nut -- I don't yet have a dial gauge to get this right so will do this in the next day or two. I sorta tightened it and made sure nothing was wobbling but wasn't TOO tight. I recall another lister saying he had OK results with this less than scientific method.
At first the car was sitting high in the front but after driving it a bit today it settled down though is still a bit higher I think. Or maybe the back is low and needs to be dealt with now...
Take it to the alignment shop and when you get it back it will be like a new car -- amazing handling. The alignment only took 30 min by a guy who knew what he was doing, and cost $50. I took a spin around the block after I put it back together and it was handling nasty! I did a home "alignment" with a couple of sticks on the tires to get them sorta parallel and vertical, and twiddling the steering links, but it was clearly way off as the wheel would not really center, and was about 10deg off center, but it got me to the shop. [UPDATE: a few months later the lower eccentric bolts had loosened and the camber was way off, and handling was nasty. Took it back to the alignment guy and for $20 he realigned it -- I think he realized he had not tightened things up enough, but the bushings had settled in too, only took about 15 minutes, so we split the diff...]
I have not yet tallied up the total cost of all this but it is probably in the $400-500 range for parts, SC rental, and shop work, or maybe a bit less. But having driven the car today it handles like a new one -- not too shabby for 23.5 years and 267k miles on!
Don't be intimidated of this job. It is not hard, though it might lead to some poopoo words if you don't have air tools to quickly/easily remove old nuts/bolts and ball joints. You can get everything apart easily in a few hours, take the bj's to the shop to get pressed, a few more hours to put back together, then to alignment shop next day. You could do this in a long day or a Sat/Sun then alignment Mon.
I would be happy to offer any words of encouragement should you need them as this is all fresh in my mind right now, though I think once you read the manual sections and this process you will find it pretty simple. Make sure you have a few "cold wrenches" for your last tool of the day...
Good luck...
--R
A Bunch of Random Info from the Benz Diesel list
This is a whole bunch of stuff I had saved in anticipation of the job, and some of it helped me a lot. I would read it just for background -- don't let it scare you as the job is actually quite straightforward IF (!!!!) you rent the spring compressor from Rusty ($75 plus the ~$700 dep you get back). Having an impact wrench and air hammer helps a lot too. Plus get the manual sections and read through them all, and write down various torque settings so you don't have to chase them down. I'll get the manual section list I have on another computer.
Get all the parts before hand and lay them out. I would order new bolts and nuts for everything -- you might be able to reuse a lot but they are cheap enough so if you strip or break something you have it. In California you probably don't have much rust or corrosion so they are probably in decent shape (mine were mostly OK here in TX) but I replaced most of them just because....
I will post this stuff on my web site and send out a link.
Have fun!!!
--R
I am just finishing the upper control arms on my 78 240D. Both ball joints
separated when I loosened the nuts holding them on. As I loosened the nut (with a jack under the lower control arm) the bj popped out as I turned the nut. I also ran a chain through the coil spring and the chassis - just in case, you don't get a second chance when something bad happens.The worst part of the job is removing the bolt/nut from the upper pivot
point in the engine compartment. I'm working on the drivers side today - difficult because the master cylinder is in the way. I may try to cut it from below with a sawzall after I dig some of the damaged rubber.I bought the upper control arms a couple of years ago and I think they were
around $80 each. The bj comes with a new nut but be sure to order a new bolt/nut for the upper connection.The lower ball joints are a different story - they have to be pressed out
and the new one pressed in.Larry '74 911, 78 240D
Subject: RE: [DIESEL] Need Balljoint advice...
Gary, Yeah, upper control arms will set you back--I'm guessin'--~$100/.
EPC does list a repair kit for the boot. Main hitch to doin' these yourself is the need for the tool to separate the ball joint from the steering knuckle; you might want to search the archives for confirmation before you go at this with a pickle fork.Might as well replace the bushings while you're there. Lower control arm
work on the other hand is strictly for the very advanced DIYer, if at all...Joe
It could be the upper control arm connection where the inner bushing
connects to the body just aft of the spring tower. You can see the bolt and nut that attach the control arm to the chassis. I just replaced both of my upper control arms and the bushings were completely destroyed after 25+ years and 279,000 miles. Not terribly difficult but frustrating at times getting that damn upper bolt out.Not really expensive either - I checked my notes and the control arms were
about $43/each, new bolts and other stuff were a little extra.This cured several problems - looseness in the steering, groans from the
suspension, etc.Larry '74 911, 78 240D
Subject: [DIESEL] Left front creaking
I've asked about this previously but didn't obtain much help, but it may have been due to way I worded my query so I'll try again. The left front suspension on my '84 300DT has a creaking sound emanating from it
somewhere upon very slight suspension movement (Note: One can exert force on the bumper or fender to obtain only ~ 1/8" of movement and notice this sound). The creaking seems to be coming from the spring/tower somewhere, but spraying many parts, including suspension items such as the idler arm connections, etc., with an oil did not allow specific location of the creak so I would know what part(s) need attention. Two other W123s ('85 300DT & '85 300TDT) with similar or greater mileage don't appear to exhibit this creaking sound. Anybody got any ideas? TIA.You're correct -- (W123) the inner, upper control arm bushing is a aluminum
arm with a rubber insert with a metal sleeve inside the rubber. The bolt goes through the sleeve and the bolt is not tightened until the car is lowered onto the suspension. The outer end is a typical ball joint that attaches to the top of the steering knuckle.Subject: Re: [DIESEL] Left front creaking
Glenn -
I think you are thinking of control arm bushings of the past. There is no
bushing to shaft wear in these control arms. Notice the lack of grease zirc fittings. The means of pivoting the control arm with respect to the bolts is actually the flexing /twisting of the rubber bushing. Therefore, if the control arm is squeaking, then either the adjusting bolt is loose, or the bushing is broken and separated, allowing relative motion between elements of the bushing. If you have a manual, check the diagrams at 33-520 and you will understand. I have only 126 and 107 manuals, but I imagine the 123s utilize a system similar to one of these designs. I'm betting it's a dry ball joint. ;^)Barry
Subject: [DIESEL] Left front creaking
Hello there Glenn...
I have your problem as well...Front passenger side. You will likely find that it is your control arm - The one with the enormous bushing inside it.
My solution is to take a thick syringe filled with oil; injecting the oil between the bushing and the metal walls - Not tried yet. The oil is to thick for a little syringe.
One person thought that the oil might expand the bushing..
Maybe that Dry lube - graphite powder might be better?
Otherwise wait till you do an alignment - remove that control arm bolt - add grease That bolt sets one of the alignment parameters... Camber?
Let us know how you made out...